

The telnet command in Linux is a protocol that was used before SSH became mainstream. Telnet is easy to connect and use, insecure protocol since all the data is transferred in plaintext. But for some quick communication, telnet can still be used. SSH, on the other hand, is used when you need to connect to the shell of another computer in a secure manner.
The telnet command in Linux stands for a ‘terminal over network‘. It helps you connect to a telnet server. Using the telnet command, you can set up a client-server connection with a remote server using the TCP protocol through a remote port.
Basics of the telnet command in Linux
The syntax for the telnet command in Linux is:
telnet [-468EKLadr] [-Xa authtype] [-b hostalias] [-e escapechar] [-l user] [-n tracefile] [ host [port] ]
At first sight, the syntax of the telnet command seems confusing and complicated. So let’s break this long chunk of code into smaller pieces to easily understand it.
The first parameter specifies the address properties with which we wish to establish a connection. Here, some of the tags you can use are:
| Tag | Function |
| -4 | Used to force IPv4 resolution of address |
| -6 | Used to force IPv6 resolution of address |
| -8 | Used to request 8-bit operation for both input and output |
| -E | Used to set the escape character to null, hence disabling the escape character function |
| -K | Used to specify the remote host for no automatic login |
| -L | Used to specify 8-bit data path for the output |
The second parameter specifies the type of authentication used while connecting to the remote host. The most commonly used tags here are:
| Tag | Function |
| -a | Attempts an automatic login operation |
| *empty field* | Leaving the field empty disables authtype authentication |
The -l tag in the next parameter sends ‘user’ as the user to log in to the remote server. It implies the -a tag we discussed earlier and can also be used with the open command. Now we come to the -n tag. This tag opens tracefile to record trace information.
The final parameter specifies the name of the host ([host]) we wish to contact and the port number ([port]) of the port we want to use for the connection.
What is Telnet Linemode?
Once we open a connection, telnet will try to enable telnet linemode. If the telnet linemode is successfully enabled, character processing takes place on the local system, while the remote system has complete control. The remote host will relay the information for actions such as when input editing or character echoing is to be disabled.
When there are changes to any special characters in the remote system, it is copied to the local system. If it fails, telnet will revert to either one of two input modes: “character at a time” or “old line by line” based on which mode is supported by the remote system.
The “character at a time” mode sends most of the text typed to the remote host immediately so that it can be processed. However, the “old line by line” mode echoes all text locally, with usually only the completed lines being relayed to the remote system.
Connecting to Remote Hosts Using Telnet Command in Linux
Now that we have understood the basics of the telnet command, we can start using it. The first step is to install telnet on your system.
NOTE: This part of the tutorial was done with the following specifications:
- A server with Ubuntu 18.04 installed.
- A non-root user with Sudo privileges.
The Ubuntu 18.04 default repository comes with the telnet package. Hence, we don’t need to download anything. The telnet package can easily be installed by entering the following in your terminal:
sudo apt install telnet
You might be prompted to enter your user password for authentication. If you get an output similar to this, your telnet package has now been installed and it is listening to port 23 by default.
Now, let’s connect to a remote host. Remember the syntax of the telnet command in Linux? The only mandatory parameter is the hostname. For this test, we will use the Weather Underground telnet service. The command should look like the following. Notice that we use port number 3000 for this telnet host, instead of the default 23.
Let’s connect to one of the public telnet servers:
telnet rainmaker.wunderground.com 3000
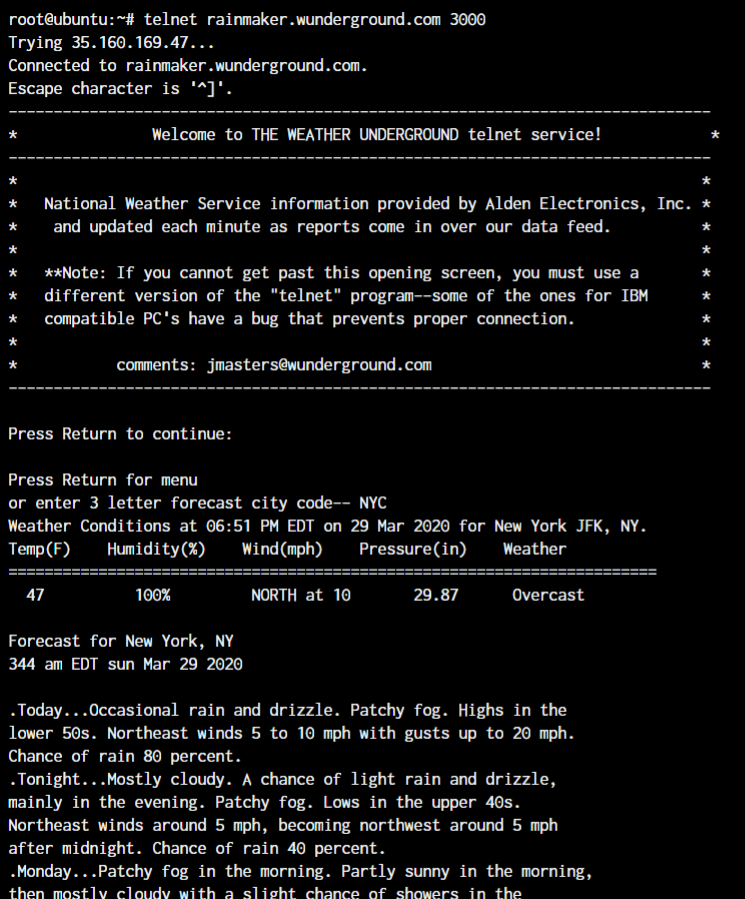
Once you are connected to a remote host, you can use any commands allowed on the terminal. What makes it different then? Well, in this case, the commands you use will be executed on the remote host, not on your local machine. This allows you to access a machine even if you are not physically present at its location.
When we wish to logout from our remote host, we use the command the following command:
telnet close
A Fun Little Telnet Server
A server can decide to display whatever it wants on the telnet terminal. Wanna watch a movie? This telnet server has been up for decades now and has a 19 minute ASCII Star Wars movie!
telnet towel.blinkenlights.nl
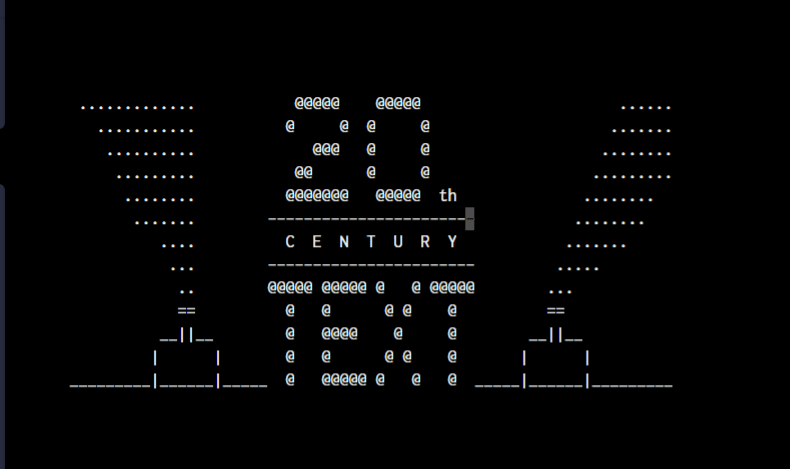
This specific host plays a 19 minute long ASCII animated version of the Star Wars: Episode IV. Have a look at the above screenshot. It shows the 21st Century Fox Logo converted to ASCII as 20th Century TEXT! And we can keep the screen on to enjoy the movie!
Finally…
While the telnet protocol was developed long ago in the year 1973, it has retained it’s relevance in communication networks even now. The telnet command in Linux allows us to use this protocol to connect easily with a remote host.
With this tutorial, we hope you were able to understand the basics of the telnet command in Linux. This command has far greater applications than what we discussed here, which you can reach by mastering these basics. For any further help, always take help of the man pages that can be accessed using the man command in Linux.