

There’s a story that goes like this: Developers at Google designed Go while waiting for other programs to compile. Traditional languages are so slow to compile that it forced Google employees to make their own language, and make their own language they did! The results are quite astonishing.
Since go was designed to run on multiple cores, it is significantly faster than other programming languages (for example Java). Take a look at the benchmarks on this website! Also with goroutines (concurrent functions that run while the rest of the code completes), go paves way for web-development and other usecases that require asynchronous jobs. In this article we will take a look into how to create our own Go workflow in Linux.
Setting up a Go development environment on Linux involves installing Go, configuring your PATH, setting up your workspace, and installing necessary plugins for your code editor. This allows you to create, build, and run Go programs efficiently on your Linux machine, enabling you to develop applications and tackle projects with ease.
Installing Go on Your Linux Machine
First step is to install Go in our machine. To install go visit this website and take a look at the instructions. For linux, we will need to first download the file and then remove any older downloads from the machine. Then, use that tar command to untar or extract the file contents to a special directory (usually it is /usr/local). For me the command was:
cd Downloads
sudo tar -xvzf go1.20.3.linux-amd64.tar.gz -C /usr/local/
Now we needed to change the bashrc PATH variable:
sudo nano .bashrc
Then add the following line at the very end:
export PATH=$PATH:/usr/local/go/bin
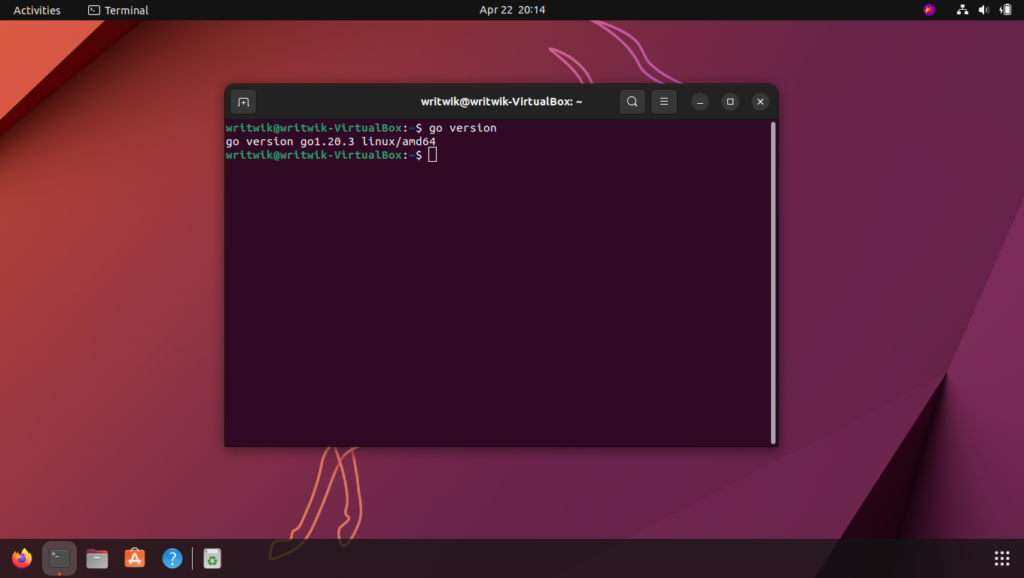
Now you can check whether the installation has been successful. First close off the terminal and open a new one, then type in the following command:
go version
Configuring Go and Setting Up Your Workspace
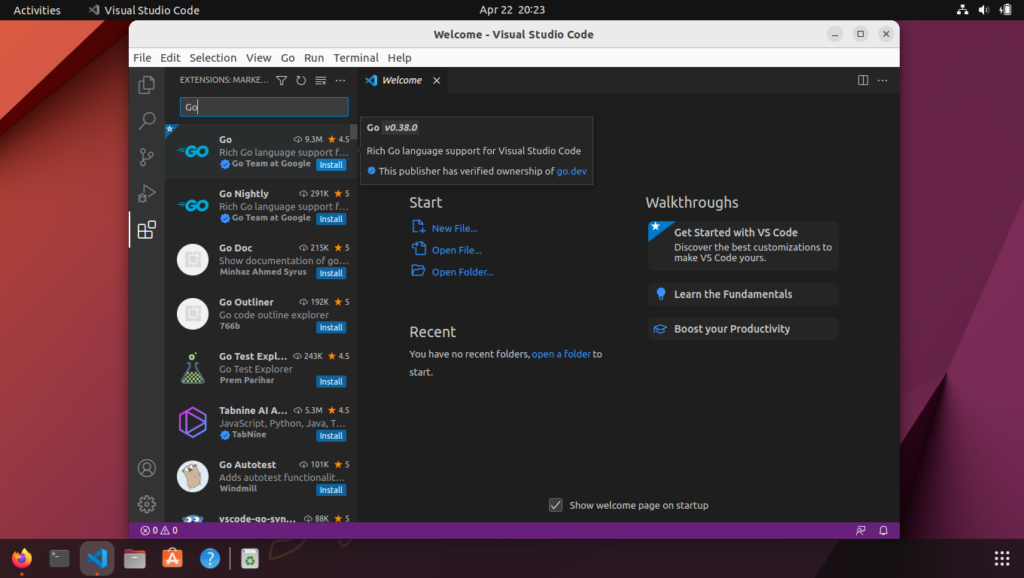
Now that we have Go installed in our system, we can use a code editor and setup some plugins that will make our life a lot easier. In this article we are going for VS Code. Go ahead and search for go in the plugins tab. Install the following plugin:
Creating Your First Go Program: Hello World
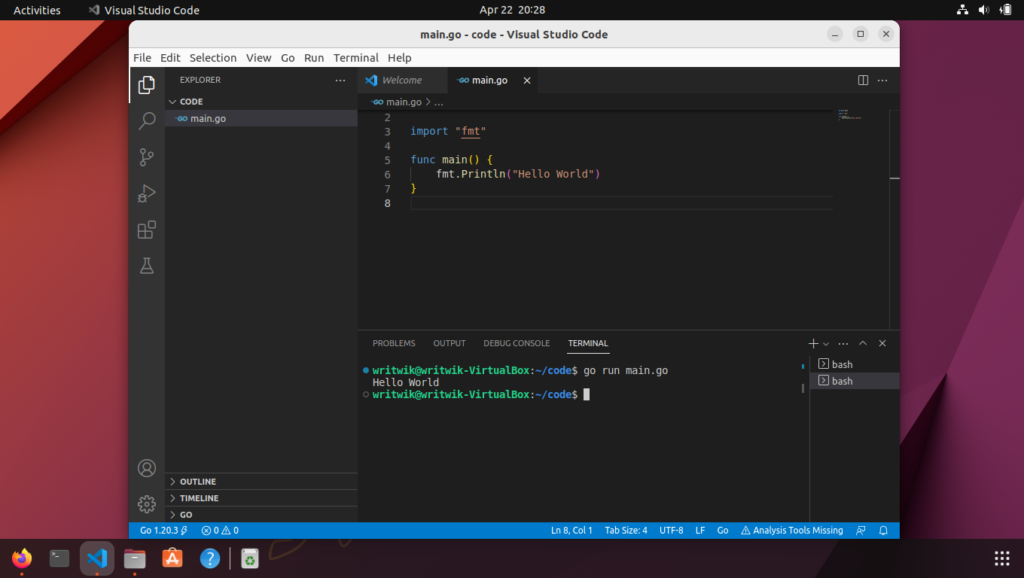
Now we can write our first go program. This is a basic hello-world program in Go:
import "fmt"

func main() {
        fmt.Println("Hello World")
}
Now you can open up a terminal and give the following code to run the program:
go run <filename.go>
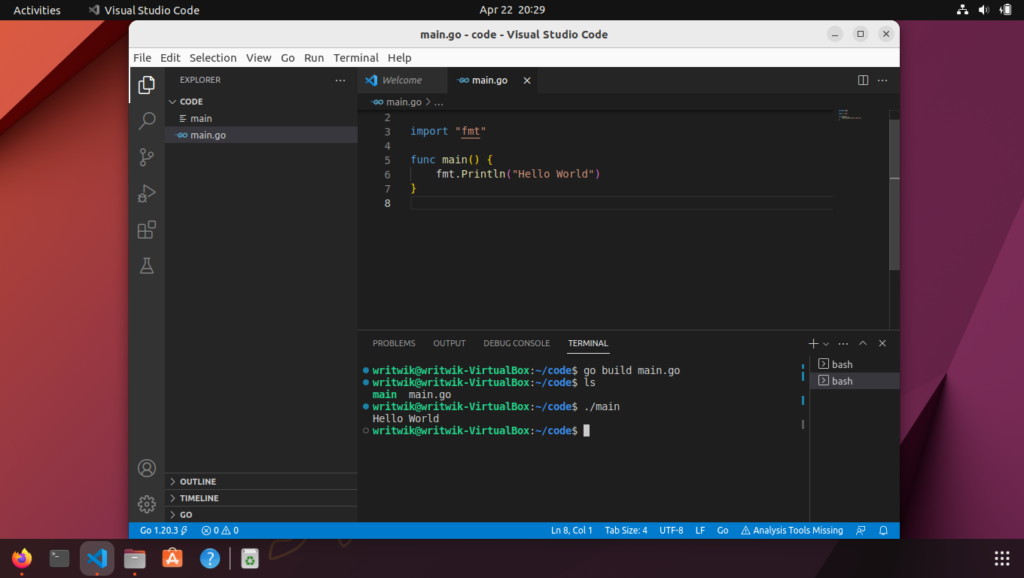
Or you could also create a executable and then run that:
go build <filename.go>
./filename
Building a Basic Amazon Product Scraper with Go
Now that you have created a basic hello-world application. It’s time to dig a little deeper and create some new projects. Go has a very nice library called colly which is a web-scraping library, let’s make a very basic Amazon Products web-scraper in go. The working of the scraper is as follows:
The user inputs a search word and the web-scraper searches amazon.in for the keyword and returns the product details on the first page of the results. For each product it will give three pieces of information back to the user: the product name, the rating of the product in scale of 5 and the price of the product. First we will need to create a go mod file, for that go to the terminal and give the command:
go mod init example.com/scraper
Next a file will be created called go.mod in your folder. Go ahead and paste the following into your go.mod file:
require github.com/gocolly/colly v1.2.0
Next give the command:
go mod tidy
Now you can code your scraper in another file called scraper.go The code is given down below:
package main
import(
		"fmt" //formatted I/O
		"github.com/gocolly/colly" //scraping framework
		"strconv"
		"strings"
		"os"
		"bufio"
)

//Results:div.s-result-list.s-search-results.sg-row
//Items:div.a-section.a-spacing-base
//Name:span.a-size-base-plus.a-color-base.a-text-normal
//Price:span.a-price-whole
//Stars:span.a-icon-alt

func main(){
	//	var search_word string
		fmt.Print("What do you want to search for today? ")
		scanner := bufio.NewScanner(os.Stdin)
		scanner.Scan()
		search_word := scanner.Text()
		search_word = strings.ReplaceAll(search_word, " ", "%20")
		fmt.Println(search_word)
		c := colly.NewCollector(colly.AllowedDomains("www.amazon.in"))

		c.OnRequest(func(r *colly.Request){
				fmt.Println("Link of the page:", r.URL)
		})

		c.OnHTML("div.s-result-list.s-search-results.sg-row", func(h*colly.HTMLElement){
				h.ForEach("div.a-section.a-spacing-base", func(_ int, h*colly.HTMLElement){
						var name string
						name = h.ChildText("span.a-size-base-plus.a-color-base.a-text-normal")
						var stars string
						stars = h.ChildText("span.a-icon-alt")
						v := h.ChildText("span.a-price-whole")
						v = strings.Replace(v, ",", "", -1)
						price, err := strconv.ParseFloat(v, 32)
						if err != nil{
								fmt.Println("Error! Can't parse Price to Int")
								return
						}
					//	price = strconv.ParseInt(priceAsString)
						fmt.Println("ProductName: ", name)
						fmt.Println("Ratings: ",stars)
						fmt.Println("Price: ",price)

				})
		})
		URL := fmt.Sprintf("https://www.amazon.in/s?k=%s&ref=nb_sb_noss", search_word)
        c.Visit(URL)
	}
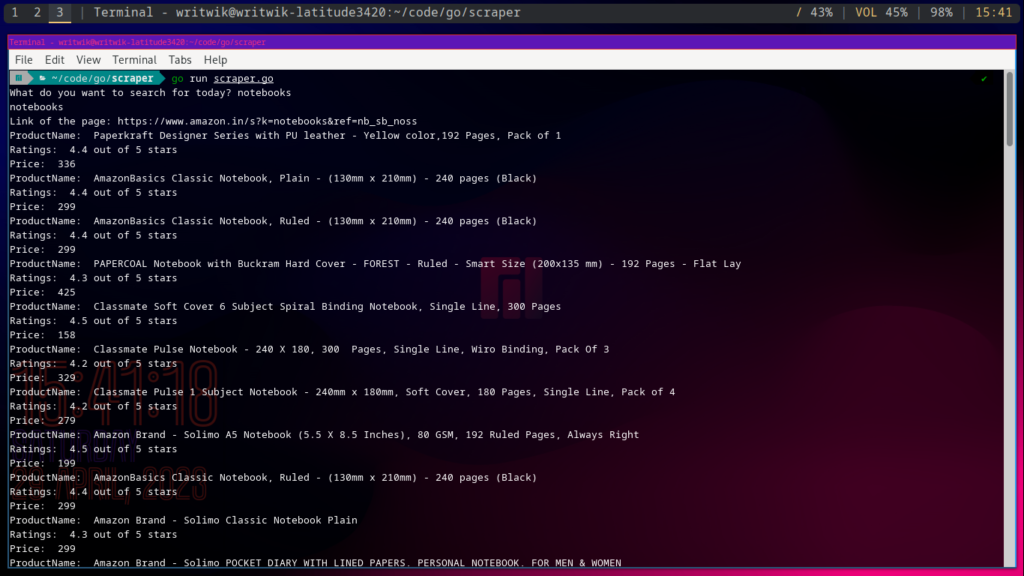
In the following picture you can see the response when I ran the code with the search-word: notebook.
Conclusion
In this article we started off from the very basics and learned how to install Go in our local machine, then check the installation by running a hello-world script in Go and finnally saw a very crude Amazon web-scraper in Go. However as an exercise you can take forward to project by writing the results to a csv file and even creating a multi-page web-scraper which will show results upto 10-15pages. For more such awesome content keep a watch on LinuxForDevices. Also checkout this article on Essential Online Security tools for Linux Developers. Thanks for reading and as always see you in the next one!