

With windows, you have a couple of well-known GUI utilities like WinRAR, 7zip, etc. that allow you to play around with archived files.
What do you do in the case of Linux?
The answer is – Linux zip and unzip commands. These are very simple yet powerful commands that allow you to play around with compressed zip files.
Also read: Extract All Compressed Files in Linux With A Single Command
Linux Zip Command
Zip is one of the first few commonly used file compression methods for computers. Though the compression offered by the ZIP method is not nearly as good as many other methods available, it does make compression very simple for a common user. It’s also integrated with Windows by default, so you just have to right-click on a file or folder > Click Send to > Compressed (zip) folder.
With Linux, it’s just as simple. If you’re on a GUI distribution like Ubuntu or Linux Mint, you most likely have a compression utility installed. So double-clicking a folder should open up the zip file.
In this tutorial, we’ll be looking at how we can use the “zip” and “unzip” command-line utilities to compress and decompress files.
Installing zip and unzip packages
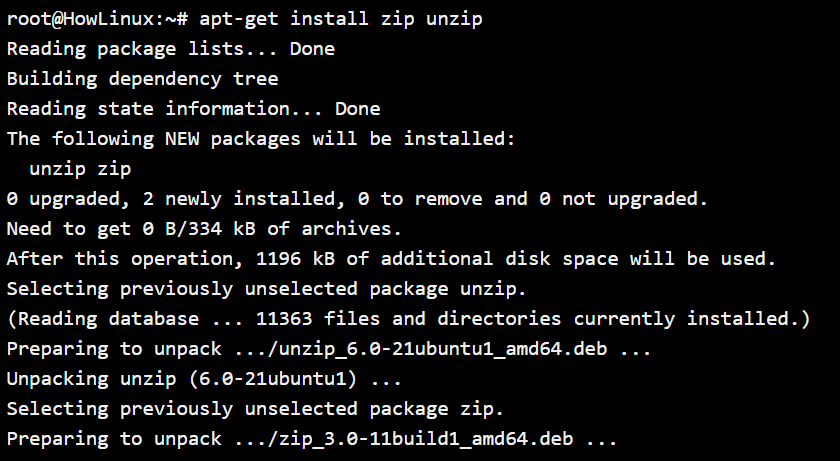
We’re using Ubuntu in this tutorial, so the package manager will be “aptitude” or “apt-get”. You can install the commands using the package manager for your system. Let’s get installing.
root@HowLinux:~# apt-get install zip unzip
Simple File Zipping using Linux zip command
You can zip a file/folder or multiple files/folders without needing any options. Let’s see how.
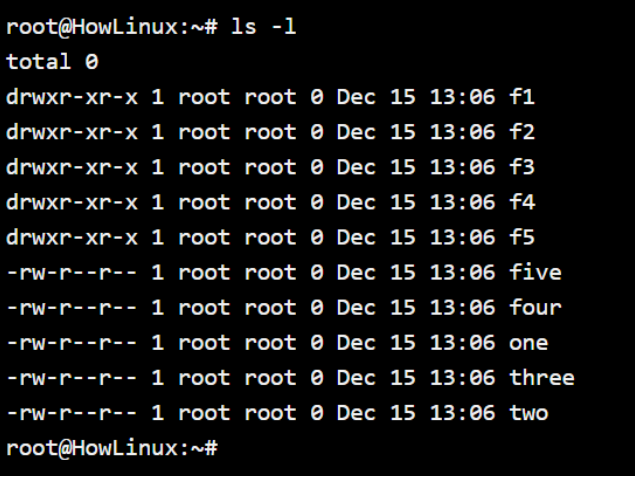
In my system, we have created a few files and folders for playing around with the zip command.
The format of the command is as below:
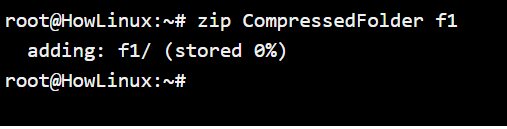
zip [name of the zip file] [file(s) or folder(s)]
Here are a few examples of how you can compress one or multiple folders.
root@HowLinux:~# zip CompressedFolder f1
adding: f1/ (stored 0%)
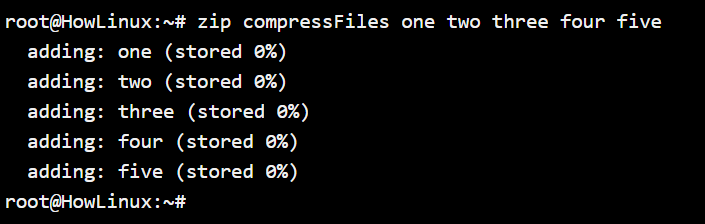
If you want to compress multiple files or folders at the same time, just enter the file or folder names as in the screenshot below.
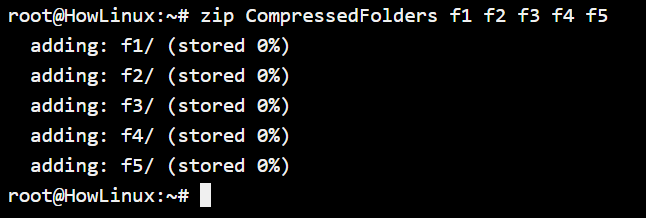
Exactly like the above example, if you want to compress files, you enter the names of the files instead of the folders (or a combination of both)
Using the -q (quiet) option
If you are compressing a lot of files, the output can be suppressed so you don’t see the list of folders that you’re compressing like in the above examples.
How do we quite the zip command output? By simply adding -q option to it.
root@HowLinux:~# zip -q CompressedFiles one two three four five
root@HowLinux:~#
Let’s see an example of how the quiet option works.

You see, the output no longer shows up while the command has successfully executed.
Excluding Files or Folders using the -x option
You want to compress all the files in a directory without having to type individual names, but there are some files that you want to exclude from the zipped file. How can we achieve this?
We can do this through the use of the -x option in the zip utility. We will also make use of the asterisk (*) wildcard character to signify that we want to include everything from the current working directory in the archive.
root@HowLinux:~# zip CompressEverything * -x two
  adding: f1/ (stored 0%)
  adding: f2/ (stored 0%)
  adding: f3/ (stored 0%)
  adding: f4/ (stored 0%)
  adding: f5/ (stored 0%)
  adding: five (stored 0%)
  adding: four (stored 0%)
  adding: one (stored 0%)
  adding: three (stored 0%)
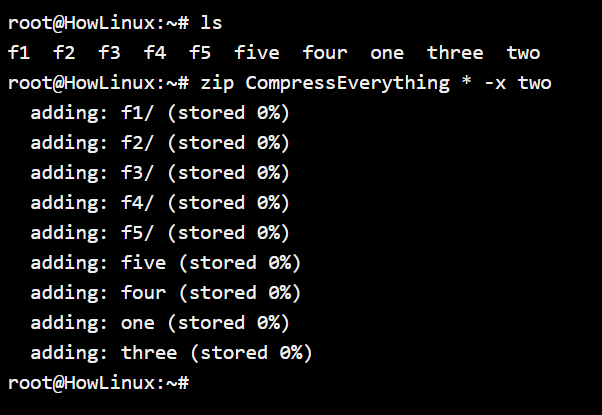
As you can see in the output, we have successfully excluded the file named “two”.
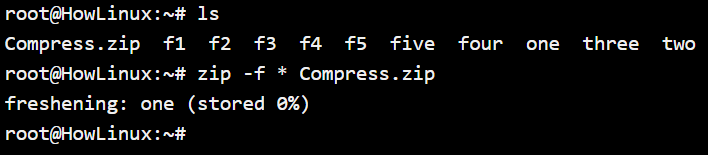
Only update changes or add new files without changing existing files.
We’ve created a zip file named “Compress.zip” which has all the files and folders. Let’s say we update an existing file in the zip file.
We can make use of the -f option, which stands for “freshen” and updates only changes made to files existing in the zip file, or use the -u option which updates changes to existing files and also adds any new files.
In the example below, we’ve edited the “one” file and added random text to it to demonstrate the -f option.
root@HowLinux:~# zip -f * Compress.zip
freshening: one (stored 0%)
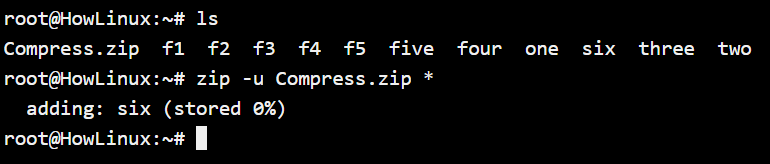
Another example of “adding” a new file to update the zip. Here we’ve added file “six” to demonstrate the use of the -u option.
root@HowLinux:~# zip -u Compress.zip *
adding: six (stored 0%)
Unzip Command in Linux
The zip and the unzip commands make use of the many of the same options with the exact same functionalities. All the above options that we’ve discussed above are also available with the unzip command. Let’s see a few examples.
Unzip command in Linux without any options
To unzip a file, you do not need to add any options by default just like the zip command.
root@HowLinux:~# unzip Compress.zip
Archive:  Compress.zip

With unzip, the default behavior is to always seek permission before overwriting files. And obviously so, because we don’ want some old files to just rewrite an updated version of it, do we?
-q option in Unzip command in Linux
Similar to the -q option with zip command, you can eliminate the output from the unzip command with the -q option. Let’s see how we can do it
root@HowLinux:~# unzip -q Compress.zip

Exclude, Update and Freshen using Unzip command in Linux
Since the usage and the functionality of these options are exactly as discussed within the zip command, we’ll combine them together.
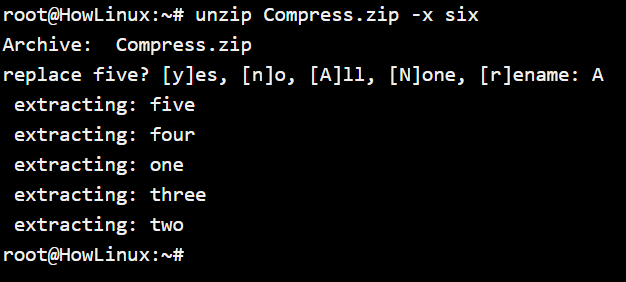
If you want to exclude a file from being unzipped from an archive, we use the -x option.
root@HowLinux:~# unzip Compress.zip -x six
Archive:  Compress.zip
To update any changes that are made to the compressed files compared to the ones in the folder, you can make use of the -f option.
But in case you have added a new folder or file to the zip file that does not exist in the folder that you’re extracting, the -u option will automatically extract/update only the required files.
Let’s see an example below of both the commands in action below.
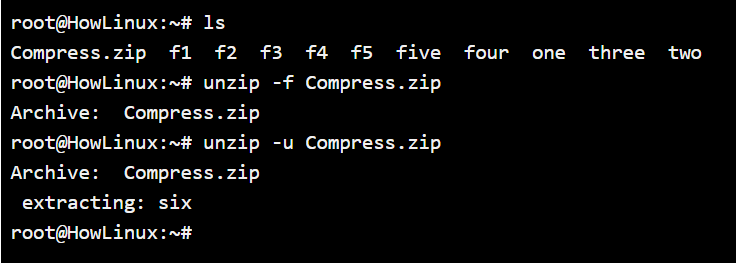
As you can see, the -f option did nothing in the above situation as there were no changes to the existing files, but the -u option extracted the missing file “six” to the folder.
Using -h (help) option and man pages
There are many more options that you may need to use with the zip and unzip commands and can be handy if you know them. Make sure you have a look at them by simply typing:
root@HowLinux:~# unzip -h
OR
root@HowLinux:~# zip -h
We also recently wrote a post on how man pages in Linux can be very helpful when you need to understand a command correctly. These pages will offer comprehensive information on the command that you’re looking for. To access the man pages for the zip and the unzip command, open your terminal and type this:
root@HowLinux:~# man zip
OR
root@HowLinux:~# man unzip
Summary
The zip utility is a very efficient and simple utility for compressing files that need to be transferred across the network or even across different operating systems. Even though the compression offered by the zip algorithm is not great, it serves the purpose.
Since the zip compression algorithm is simple, so are the packages used for compressing the uncompressing zip files. Just practice a few times, and you will become very efficient with the functionality of the commands.