
In this tutorial, we’ll cover the killall command in Linux. We recently posted a tutorial on the kill command in Linux where we covered the usage and the functionality of the command. Today, we’ll go over how to use the killall command in Linux, and understand the difference between kill and killall commands.
What is the killall Command in Linux?
When working with a Linux system, there are times you need to kill processes and this is where wrappers like kill, pkill, and killall come into the picture. The killall command is similar to the kill command which allows us to terminate processes by sending a kill signal to the processes. But why would we need two or even three commands for the same thing? Let’s see the difference between kill and killall commands.
What is the difference between kill and killall Command in Linux?
The kill command is a basic wrapper for the kill system call on Linux which only understands PIDs and needs external help to translate processes into PIDs. The killall command in Linux is also a wrapper for the kill system call, but with the additional help that it provides by determining and passing on the PIDs with the help of process names, user names, etc.
Both the commands offer the same results with different behavior. One kills processes with the use of PIDs while the other can also work with process names.
How to use the killall command in Linux?
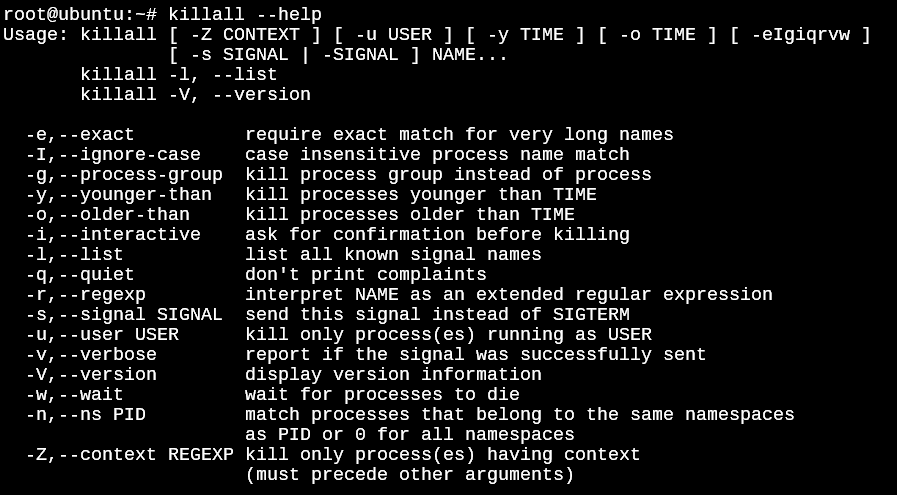
We’ll start by having a look at the output of the help option and then discuss the most frequently used killall options that allow us to kill processes. Run the following command on your Linux system.
root@ubuntu:~# killall --help
The most basic usage of the killall command is as below:
root@ubuntu:~# killall <process name>
When the <process name> part is replaced with an active process, the above command will find the PID of the specified process and pass it to the kill system call to terminate the process.
Understood till here? Now, let’s understand some of the options that the killall command offers.
1. killall –exact-match Option
On servers, many processes can have similar names and you do not want to kill a process that was not intended because of an incorrect match. To avoid these situations, we make use of the -e option which allows us to match the name exactly as specified before killing the process.
root@ubuntu:~# killall -e bash
AND
root@ubuntu:~# killall -e Bash
In the screenshot below, I’ve executed a shell script that sleeps for 10 minutes in the background multiple times for the demonstration.
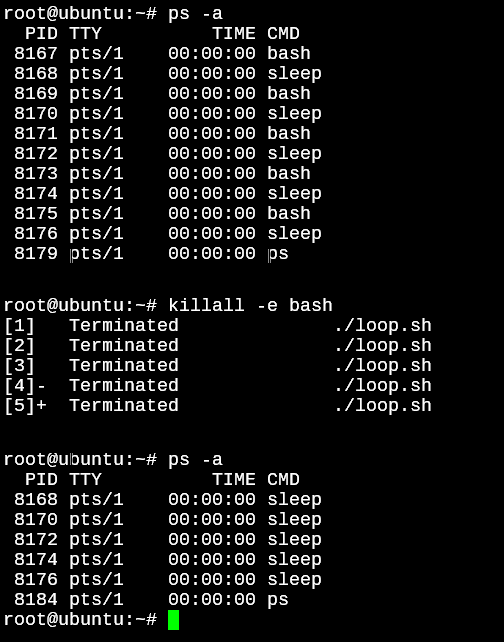
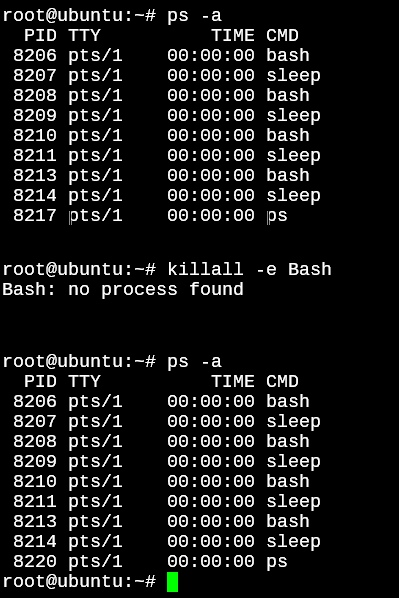
As you can see, in the first screenshot, the scripts are killed because we provided the exact match name, bash, which is the shell with which the scripts are being executed. But the second time we ran the command with an incorrect case, the process wasn’t found. Do note: Matching process names exactly as specified is the default behavior for the killall command in Linux. It will give you the same output if you try the above example without the -e option.
2. killall –ignore-case Option
We know that the default behavior of the killall command in Linux is to match the process names exactly as specified. But in situations where the capitalization in a process name is unknown, we can make use of the -I option.
root@ubuntu:~# killall -I BaSH
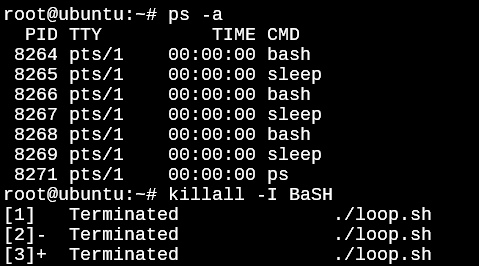
It automatically terminated the scripts even though the case specified did not match the actual case of the process name.
3. killall –younger-than And –older-than Options
We don’t only have to have to use names but can also use time. If we know there are processes that have been running for quite a long time and we don’t want to them exist any longer due to updates or any other reason, we can make use of the -y or -o command options.
The format of the command option is as below:
root@ubuntu:~# killall -y 1(s/m/h/d) <process name>
OR
root@ubuntu:~# killall -o 1(s/m/h/d) <process name>
We do need to specify a process name by default, but we’ll also look at how we can kill all processes for the time specified. The s/m/h/d stands for seconds, minutes, hours, and days.
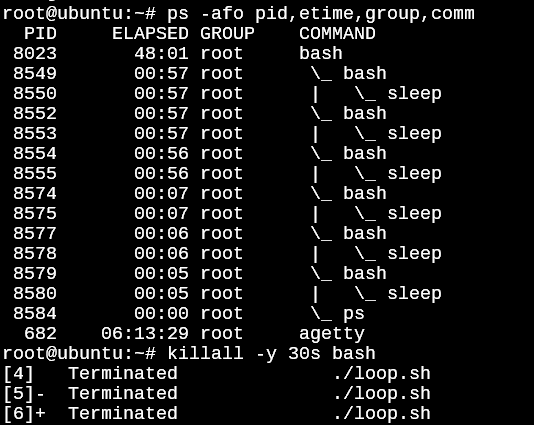
As you can see in the above example, all the instances of our scripts that were started within the last 30 seconds are killed. The time elapsed can be seen in the output of the ps command above for reference on which of the processes were killed.
How to kill all processes for the specified time without typing the process name? We’ll need to make use of Regular Expressions to kill everything.
root@ubuntu:~# killall -y 1m -r ".*"
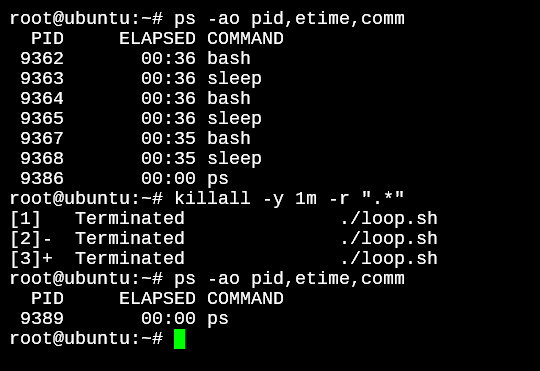
In the above example, we’ve used (.*) which in regex is used for “everything”. So all the processes started within the past 1 minute, irrespective of the names will be killed.
Specify Signal When Killing Processes
By default, if no signal is specified, killall sends the SIGTERM signal. This is a generic signal and can be easily blocked, handled, or ignored by a program. This signal is like asking the program to terminate itself.
You can list all the available signals with the use of the -l option for killall.

There are a host of signals that killall command can send to a program. Here’s an explanation of a few commonly used ones.
- HUP – Stands for Hang Up. This reports to the process that the network terminal has disconnected
- INT – Stands for Interrupt. This signal is like pressing the interrupt keys (Ctrl+c) on a terminal.
- QUIT – Stands for Quit. This is the signal that is generated when a program encounters a fatal error
- ILL – Stands for Illegal instruction. This signal is generated by the system when an illegal expression is sent to the processor. It is very rare because most of the illegal expressions are caught while a program compiles.
- KILL – This signal forcefully terminates the program and does so immediately. It cannot be handled or ignored by a process
To use one of the signals from the list that we saw in the above screenshot, you can use the format below.
root@ubuntu:~# killall -s HUP <process name>
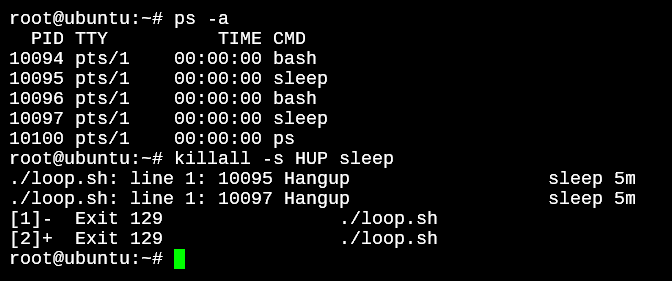
The HUP signal terminates the processes quickly since it signals that the user is no longer connected.
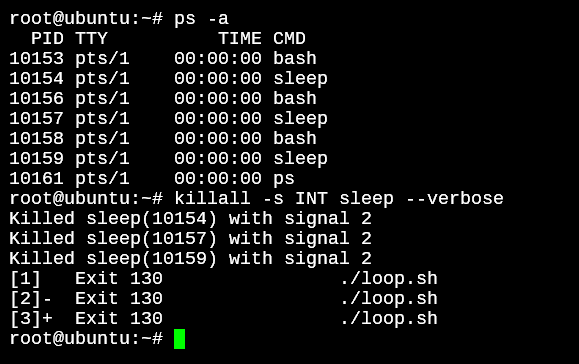
The interrupt signal also terminates a process immediately since the signal explicitly sends an interrupt key sequence to the process. I’ve added the killall –verbose option since the INT signal does not show the signal name in the output. The verbose option with wait lets us know the signal that was used to terminate a process.
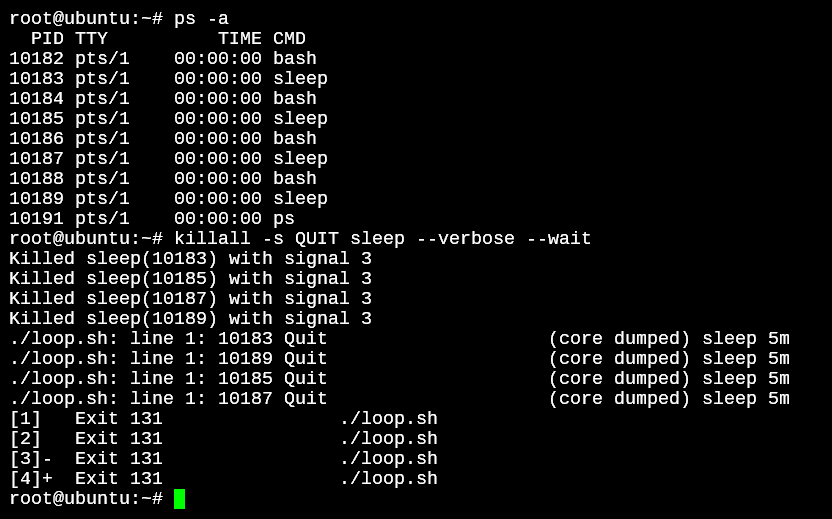
In the above example, I’ve used the killall –wait option because the QUIT signal simply asks a process to quit. But without the –wait option, the killall command ends itself as soon as the signal is sent. In the above case not adding the –wait would cause the “Exit 131” lines to be displayed after the bash prompt since the processes hadn’t ended yet.
Kill Processes By Username
Not only can we kill processes by process name, but also with usernames. The killall -u option allows us to specify the username.
root@ubuntu:~# killall -u root
Now, for obvious reasons, executing the above command is not recommended because it will kill pretty much all the essential services that keep your system running.
A fun little side note, I got myself disconnected from the ubuntu server when I accidentally ran the command while trying to copy it! But well, this stunt was performed under expert supervision. Don’t try it at home!
Conclusion
So you now know how to kill processes in a Linux system. If you’re interested in learning more about the command, do refer to the man pages for this command by typing in man killall in your terminal.