
In this article, we will be learning about some basic and very essential Git commands to get started with git. This article is meant for people who don’t have any previous knowledge of git or are just taking their first steps in learning it.
What is git?
Git is one of the first open-source software originally developed by Linus Torvalds to manage his Linux project. Git is now the most powerful and widely used version control system. In fact, it is one of the must-know tools if you are collaborating with people in a software development project.
Git is a pretty useful software with lots of commands and options. The official git docs cover all these commands and their options in minute details, but as always it can be a little intimidating for people who are new to it.
Git commands
So we start with a gentle introduction to the commands in git.
1. git clone command
Any version-controlled repository is generally hosted in a server. The server can be anything, it can be a remote computer, local mainframe, or a cloud storage service. The popular cloud-based servers that let you host your repositories are – GitHub, GitLab, and BitBucket.
To change/use the content in the repositories in the server, you may need to copy(clone) the contents of these repositories into your local machine. Git clone does this thing for you.
Recommended read: Shallow clone on Git
The syntax for git clone is:
git clone <repository-link>
2. git checkout command
While using git you need to work with a lot of branches that contain a lot of commits in them. To move to each commit and branches we use the checkout command. You will learn more about commits in the latter half of this article. Let us understand a branch first.
A branch is simply a path of development of the software. Git can have multiple branches which are independent of each other.
- These branches are important because they allow different states of the software to be present at the same time. There can be a
mainbranch which contains all the tested features, adevbranch which contains the latest (and some untested) features andstablewhich contains the stable version of the product. - On other use is we can create a separate branch for each feature, develop the feature and merge it back to the branch.
The syntax for using git checkout is:
# Go to the already existing branch <branch-name>
git checkout <branch-name>

# Create a branch from latest commit and got to that branch
git checkout -b <branch-name>
Note: Git checkout command can do a lot more things, but is out of the scope of the current article.
3. git add command
Git is able to detect any changes that you make inside any file inside the repository. It is up to you whether you want to stage these changes. To stages the changes made in the certain file(s) we use the git add command.
The syntax for using the git add command is:
# To add a single file
git add <file.name>

# To stage all changes to python files
git add *.py

# To stage all changes made to all files in the repository
git add .
4. git status command
The above command – git add can become confusing when you are changing/adding multiple files in a repository. Or sometimes we need to see what all changes are made to the repositories that were not staged.
The git status command shows us the unstaged changes made to already present files as well as lists new files that are added(untracked files).
The syntax for git status is simple:
# Show the full status
git status

# A little compact git status
git status -s
5. git commit command
Git commit is one of the most important commands in git. Before we dive into the command description we need to know bit about the commit itself.
Commits in git are the nodes in a git branch. Commits represent the state of the software at that point of time. Commits are represented by unique-SHA1 numbers. Checking out a commit sets the repository to the state of the software when the commit was made.
Git commit command takes the staged changes made to the repository and makes a commit to the current branch.
Commits are not easy to read since they are represented by SHA values. To solve this problem we can add a message to a commit, to make it more readable.
The syntax for git commit is:
git commit [-m "<Message>"]
6. git push command
Now that you have made commits to the repository you can view the status of the repository using git status. It might show you that the current branch is ahead of the remote branch by a number of commits. Why is this happening?
The commits made to the current branch stays in your local environment unless and until you decide to push these changes to the remote. So if you want to make your changes global, remember to push it.
You have to explicitly mention the remote and the branch that you want to push to. The syntax for git commit is
# The name of the remote is generally origin
# Make sure to checkout the correct one before pushing
# using git remote -v

git push origin <branch>
Note: Git can’t push unless and until the working directory is clean of any uncommitted-changes.
7. git merge command
Our last command is git merge. Git merge is a little more critical and complicated than the previous commands.
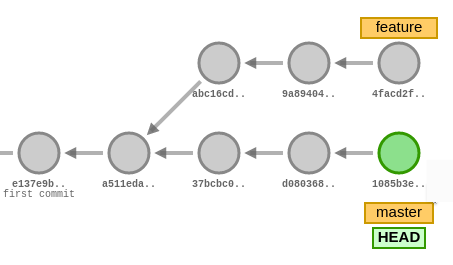
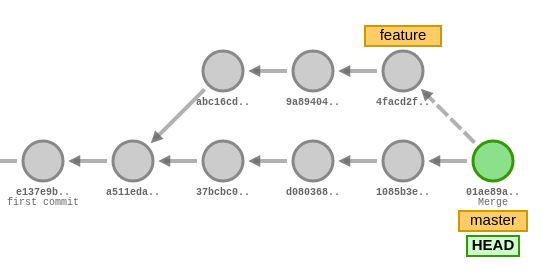
Git merge is useful when you want to commit the changes from one branch to another branch. Here is a hypothetical situation: You have two branches – main, and feature. The feature branch was created to add some features to the main.
Some independent changes were made to the feature branch and now the feature is ready. In the meantime, there has been commits to the main branch itself. Git merge accumulates the changes made to the branch and makes a new commit at the top of it. Here is a visual representation:
The syntax for git merge is:
# The <branch-name> branch is merged into current branch
git merge <branch-name>
Note: There might be some conflicts because of some conflicting changes made in the branches. To stop the merge process you can use git merge --quit command. You will need to learn more about conflict resolving when you are collaborating with a lot of developers.
Conclusion
This brings us to the end of the article. These are only the beginner level commands to help you started with git. If you are interested you can see more intermediate level article on git commands like rebase and stash. Stay tuned if you are interested in reading about more such open-source tools.