
Screenshots are an indispensable part of documenting processes, and are used by people for both their personal and professional uses.
Ksnip provides an easy-to-use platform to take, edit, annotate and save your screenshots in a simplified manner. It is cross-platform and works in all the popular Linux distributions, allowing you to use it regardless of your platform.
How Ksnip can benefit you
- Capture Options:
Ksnip offers a variety of options to capture your screenshots, as well as in various layouts. It is highly flexible, customizable and caters to your every needs, allowing you to capture the desired content as efficiently as possible. - Annotations Suite:
Ksnip also offers a wide annotation suite. You can use various tools like pens, pencils, brushes and more to highlight, underline, add shapes and more, to your screenshots, making them more useful and palatable to your audience. - Image Editing:
Ksnip also comes with basic image editing and manipulation features such as blur and pixelate effects, enabling you to censor/hide sensitive data while maintaining clarity for the rest of the image content. - Open-Source:
The icing on the cake, ensuring that Ksnip is always going to receive updates, and that new features are always being worked on. Moreover, it’s free and transparent, a perfect choice for individuals and organizations.
Installation
Now, it’s time to go through the different methods of installing and running Ksnip on your Linux distribution. A few different methods to install it have been explored in this article so that readers may have the most flexibility in choosing their method of installation.
Using Package Manager
Step 1: Open a Terminal:
Firstly, launch a terminal on your Linux system. You can do this by searching for ‘Terminal’ in your systems’ application menu or use the shortcut key combination for launching the terminal ‘Ctrl + Alt + T’
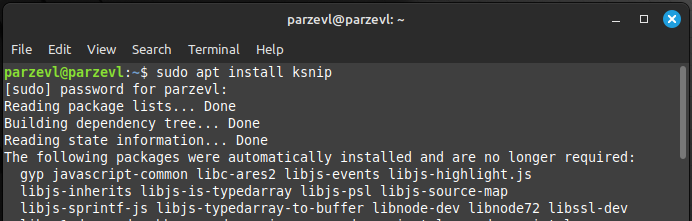
Step 2: Install Ksnip:
Ksnip is available through the official apt command in Linux Mint/Ubuntu. You can run the following command in the terminal:
sudo apt install ksnip
Ksnip is also available through the default package manager, Pacman, on Arch Linux. Simply run the command as below and Ksnip will be installed.
sudo pacman -S ksnip
Using Debian Packages
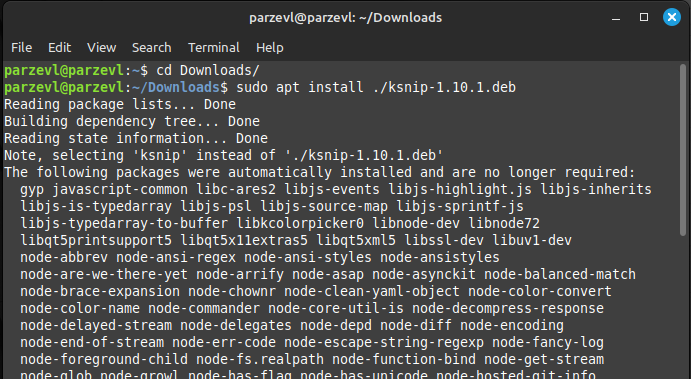
Step 1: Download the Debian package
You can simply install Debian packages by going to the official Ksnip GitHub repository.

Step 2: Install the Debian Package
Make sure to replace the “ksnip*” with the actual filename with the version that you just downloaded from the Ksnip repository. To install the package, type the following commands in your terminal:
cd Downloads/
sudo apt install ./ksnip*.deb
Using and Running an AppImage
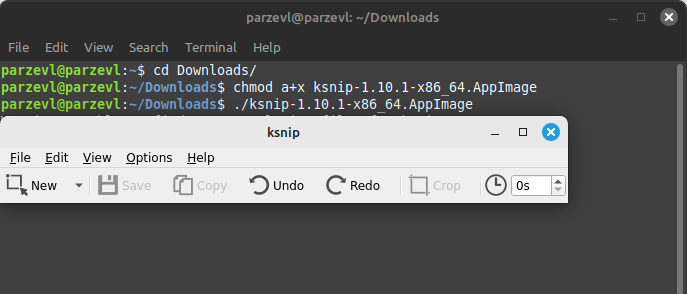
Step 1: Download AppImage
To use the AppImage, firstly we need to convert them to an executable file and run them simply. In this case, we don’t need to go through an installation process.

Step 2: Run the AppImage
Next, to run the AppImage, you can run the following commands. Make sure to replace the “ksnip*” with the actual filename with the version that you just downloaded from the Ksnip repository. To learn more about AppImages, you can read this article here.
cd Downloads/
chmod a+x ksnip*.AppImage
./ksnip*.AppImage
Using Flatpak
You can also install Ksnip using Flatpak by using the following command. You can learn more about setting up and enabling Flatpak on your Linux system in this article here.
flatpak install flathub org.ksnip.ksnip
After this, you can run the command given below to run the application:
flatpak run org.ksnip.ksnip
Conclusion
Ksnip is constantly improving, thanks to it being actively open-source. It’s one of the most useful applications that you can download and install, whether you’re a student or a professional. The features that it provides are a must-have for everyday documentation purposes, and much more. The editing and annotation suites are well-equipped, and offer a variety of use-cases to its users. It is supported widely on multiple platforms and easy to install, setup and use.