
Imgcat is a simple tool used to view images and GIFs right on your Terminal. But in the world of GUIs with sleek and modern appearances, why would anyone want to view a photo in the CLI? Using a Photo viewer is a much better option, and if you use Ubuntu/Linux Mint, you already have one pre-installed.
Well, imgcat is not looking to be a replacement for a photo viewer application. It is rather a much more convenient solution to quickly look for an image in your directory. As a Linux user, you are most likely to spend your time in the CLI (Command Line Interface) rather than the GUI.
In this article, we are going to look through how imgcat can make image viewing much more convenient and quick in the terminal, and it can be useful to you. We will then go through the different ways to install it on your Linux system.
Why use imgcat?
- Quick Previews: Imgcat is a useful tool to quickly open and preview an image file. It’s a convenient tool if you use Linux only on a command-line, with no access to a GUI, for example, in a server-based environment.
- Quick Verification: It eliminates the need for you to open an image viewer if you just need to quickly verify whether you’re working with the correct image file or not.
- Remote Access: Imgcat also works well if your image file is in a remote server. You can simply provide the URL to the image in the remote server and imgcat will conveniently display it for you.
Pre-requisites
It should be noted that the terminal is required to support True Color (24-bit color) as well as use a monospaced font that includes the lower half block Unicode character (▄ U+2584).
Moreover, if you’re building the imgcat repository from source, you need to have Go installed in your Linux environment.
You can install Go from the official Go download page here. If you wish to learn how to set up Go for your Linux system in a step-by-step manner, you may go through this article here.
Installation
Now, it’s time to take a deep dive into the step-by-step procedure for installing `Imgcat` on a Linux System. We’ll use Linux-Mint/ Ubuntu as an example, but the steps may vary slightly depending on your Linux distribution, and it’s always a good idea to check the official documentation for any distribution-specific instructions:
Building from Source (GitHub)
Step 1: Confirm your Go installation
In your Terminal, first confirm that you have a working Go environment on your system by executing the following command on your system:
go version
If a valid Go version is displayed, then you can move on to the next step. Otherwise, you can refer to the Pre-requisites section to install Go.
Step 2: Install from GitHub
For building in Go, you don’t need to separately clone the GitHub repository and unpack it. However, here is the GitHub page for imgcat, built by user danielgatis.
Now you can run the following command in the terminal to build imgcat:
go install github.com/danielgatis/imgcat@latest
Using Snap Store
Imgcat is also available to download through the Snap store. If you need help in setting up Snaps on your Linux environment, you can go through this article here.
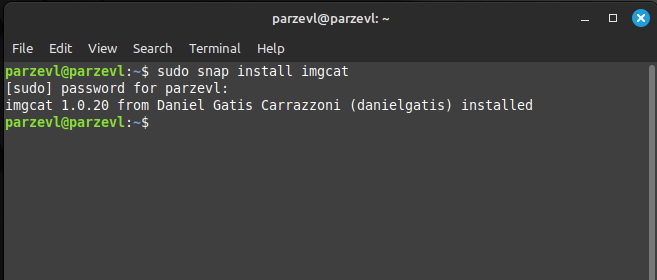
You can execute this command in your Terminal to install imgcat on your system:
sudo snap install imgcat
Usage
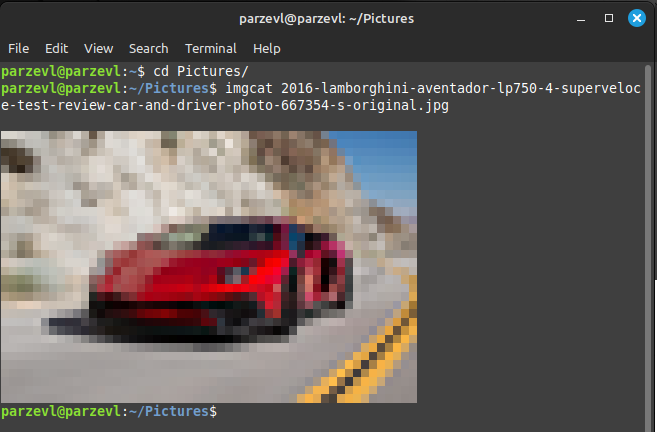
Using imgcat to display images and GIFs in your Terminal is as easy as it can be. Simply use the following commands in terminal:
# For displaying Images
imgcat image.png

# For displaying GIFs
imgcat video.gif
Conclusion
In conclusion, imgcat provides a wonderful solution to a very particular use-case. It is a good-to-have tool in your Linux toolkit, one that is reliable and works out of the box smoothly. It is also open-source, and we can surely expect it to have more features upgrades in the near future.