
In this tutorial, we will learn the steps to install GUI on Ubuntu Server. Ubuntu server is a server operating system which by default comes only with the command-line interface. In cases where you need a graphical interface, we need to have a desktop environment.
Installing Complete Desktop Environment
We will be looking into various components of GUI later in this tutorial so that you can have lightweight installation, installing only components that you need.
However, if you don’t have any memory or processor constraints, you can simply run the following command to install Ubuntu’s default desktop environment:
sudo apt update
sudo apt upgrade
sudo apt install ubuntu-desktop
That’s it! It will install all the GUI components you need and on your next boot, you will land on the good old login screen.
Along with the desktop interface, the above command will install a tons of other recommended packages like the LibreOffice, printer-drivers, calculator etc. that you might not need.
You can check the list of all these packages, by simply running apt-cache depends ubuntu-desktop. If you wish to install ubuntu-desktop without all the recommendations, you can run the following command:
sudo apt-get install --no-install-recommends ubuntu-desktop
There are other desktop environments you can install as well for your machine. Here I have listed out all the commands to install popular desktop environments.
If you want a lightweight installation of any of these, you can simply add the --no-install-recommends tag and it will skip installing recommendations.
#To install KDE/Kubuntu
sudo apt install kubuntu-desktop

#To install Gnome
sudo apt install ubuntu-gnome-desktop

#To install XFCE/Xubuntu
sudo apt install xubuntu-desktop

#To install MATE
sudo apt install mate-desktop

#To install Openbox
sudo apt install openbox

#To install LFCE/Lubuntu
sudo apt install lubuntu-desktop
Install GUI on Ubuntu Server – Installing Individual Components
Now we will be discussing various components of GUI and how to install them. A Desktop Environment can take a lot of memory and processing power. You can choose to install all components you need according to your needs. Here is a structure you can expect in almost all desktop environment:
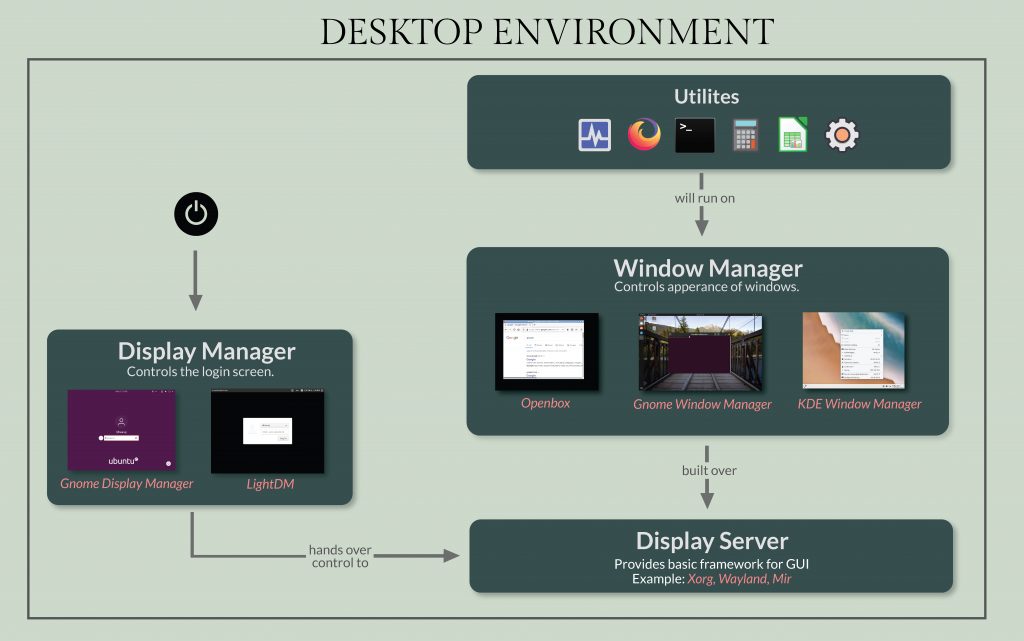
1. Display Server
Display server or Windowing System is the building block of a desktop environment. It provides the basic framework for GUI environment. One of the most popular display manager for Linux is X.org.
Most of the desktop environment are built over xorg. We will need xorg for our GUI, so you can run the following command:
sudo apt install xorg
2. Window Manager
A window manager controls the appearance of the windows. They will determine all the details for a window like the size of the window, menu bars style, resizing functions, dragging function etc.
Different desktop environment use different window manager, for example KDE uses kwin, XFCE uses xfwm and so on. Here we will be installing a lightweight window manager known as openbox.
sudo apt install openbox
Now after running this, just run the command startx and you should land on your desktop. Since this desktop only has a window manager. So, it will not have any icons or task bar. You can go to the menu by right clicking anywhere on the screen. It should be looking something like this:
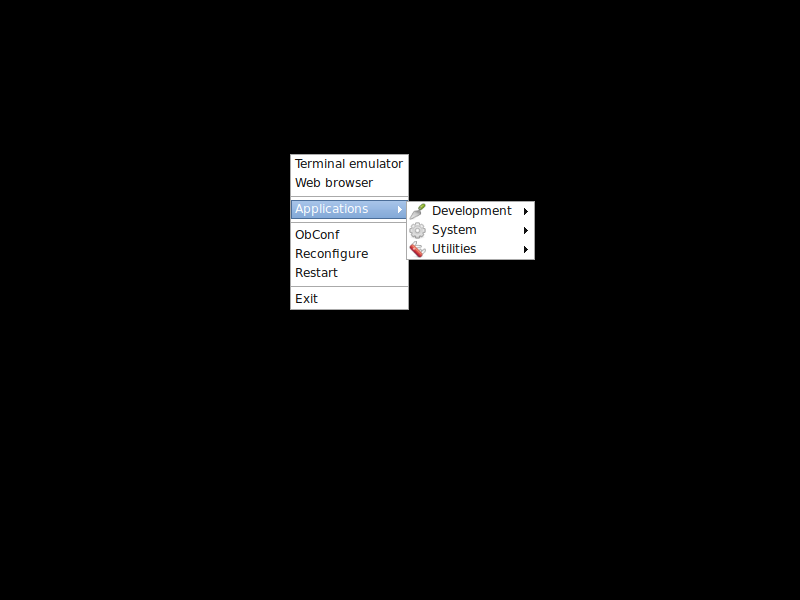
This is a functional system with limited GUI elements. Generally, using only a window manager is the closest you can go to having the most minimal system. But the functionality will be lacking.
We currently have a lot of missing elements. First of all, we don’t have a login page yet. You have to first login through the command line interface and then run startx to get into the GUI, everytime your system boots.
Then, we don’t have any icons, menu bar, dock, screensaver etc. We also don’t have any web browser or any such applications. All of these missing utilities have to be installed separately. We will be learning how to install them in the next step, however, you can choose not to if you don’t need them and you will be good to go.
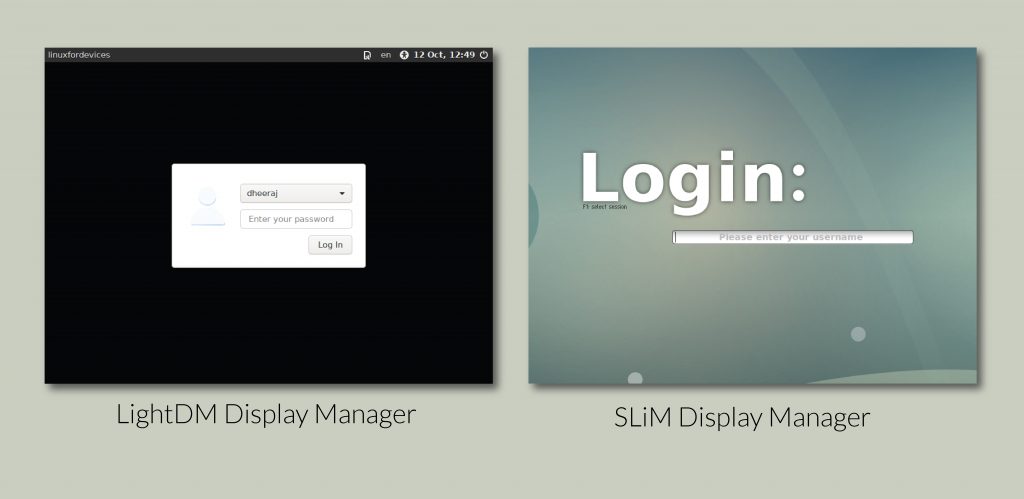
3. Display Manager
Display manager is also known as login manager. It’s mainly responsible for the login screen that you see when you first start your machine. Display manager is also responsible to start the display server and load the desktop environment.
Previously we had to separately run the command startx from CLI to load GUI. Display manager will do that job for us, such that after login we will directly be landed to the desktop.
Again, every desktop environment uses different display manager. Out of plethora of options, if we need to choose a light weight DM, I would recommend LightDM and SLiM. Here’s how to install them:
#To install LightDM
sudo apt install lightdm
sudo apt install lightdm-gtk-greeter

#To install SLiM
sudo apt install slim
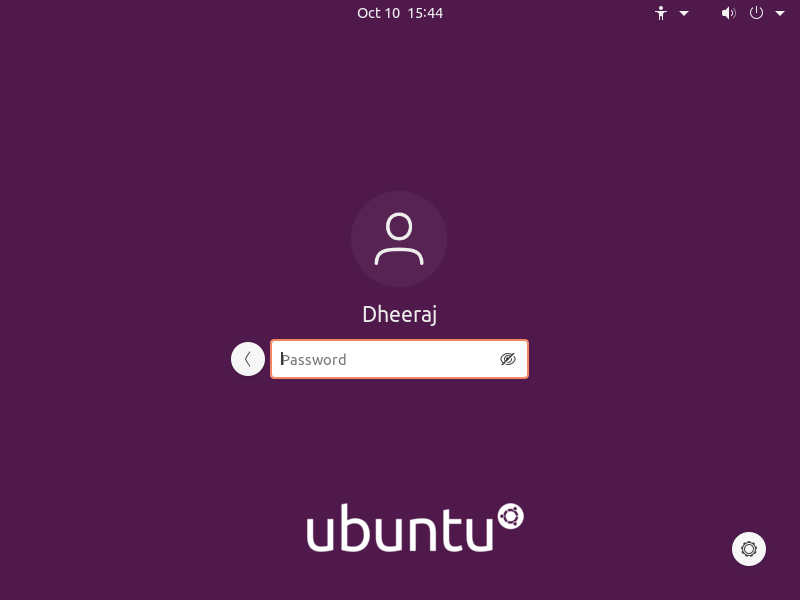
You can reboot the machine now and you will see the login screen as shown below:
4. Other Utilities
Whatever we have installed till now is the bare minimum required to install GUI on Ubuntu Server. You can install various other utilities depending on your needs.
For example, you can install a web browser, may be a screensaver pack, network utilities, icon packs, dock etc. These packages are available online and can be installed with the apt command. I have listed a few of them here:
#To install a web browser:
sudo apt install firefox

#To install a screensaver
sudo apt install xscreensaver

#To install icon-theme
sudo apt install papirus-icon-theme
sudo apt install lxde-icon-theme

#To install network-manager
sudo apt install network-manager
Conclusion
There you go! We have successfully installed a lightweight highly-customizable GUI. It is easier once you understand all the basic components running underneath so that you can pick all the necessary tools that you want. I hope this tutorial was helpful for you and you were able to install GUI on Ubuntu server! Have a great day ahead! Cheers!