

In this tutorial, we will learn how to install Apache Maven on Ubuntu/Debian operating system.
What is Apache Maven?
Let’s first learn about the Apache Maven. Consider a scenario where you are creating a Java application with a database. Hence, you would need a JDBC connector to connect it to the database. Take another situation, You are working on Spring MVC. Therefore, you need at least 10-12 dependencies or JAR files to execute the project.
Even if you change the project from spring 4 to spring 5, we need to change all the dependencies. Yeah! I know, you would say I am a programmer and can download it. Folks, tell me one thing how many dependencies will you download? Here we have a solution! Apache Maven provides all the dependencies related to the project.
Apache Maven is the project management tool i.e. based on POM (Project Object Model). It is the tool which provides all the JAR files or dependencies to the project. Just go the Maven repositories, search for the Jar File you want. Add that dependency in the POM.xml file. Check the Maven repository link to download the dependencies as required.
Whenever you build the new project or want to add a new dependency, make sure you are connected to the internet as it will fetch the dependency from the remote maven repositories. For detailed information, check the Maven Official Documentation.
Let’s discuss how to install Apache Maven in Ubuntu/Debian. The below steps will help you install the latest available maven package from the official website.
Install the Java through commands in Ubuntu/Debian
The first step is to install Java in order to install Maven. We have many methods to install Java either you can install default JDK or Oracle JDK. The choice is yours. Install the JDK and don’t forget to set the environment variables. Check the tutorial on how to install Java in Ubuntu/Debian? Follow the steps and complete the installation.
After successfully installing the JDK, can check the version of the Java installed using the following command:

Install Apache Maven in Ubuntu/Debian
After successfully installing the Java version, the next step is to download and install Apache Maven in Ubuntu. We will use the wget command to install the Maven package. Check for the latest version of the Maven from Maven Official Documentation. Copy the link address and use it with wget command.
It will download the tar file. The archive file will be downloaded using tar command. But before this, folks don’t forget to change the directory. We’ll download this file in the /opt/ directory to keep things organized.
cd /opt/
sudo wget https://downloads.apache.org/maven/maven-3/3.6.3/binaries/apache-maven-3.6.3-bin.tar.gz

You can check the downloaded tar file using ls command in Ubuntu as shown below:

Extract this archive using tar command and can check the extracted file using ls command as shown below:
sudo tar -xf apache-maven-3.6.3-bin.tar.gz
ls

Here we can change the name of the folder or just move the contents of the folder to the new folder. We are doing this for our convenience. Here, we will use the mv command to move the contents. Let’s have a look at the command below:
sudo mv apache-maven-3.6.3/ apache-maven/

Configuring the Apache Maven Environment
After you install Apache Maven in Ubuntu, the next step is to configure the Apache Maven environment i.e. to add the necessary path to the service file. Here, we have to create a maven.sh file in /etc/profile.d directory. Create the file using nano or vi editors. I will be using nano editor. You can use any of the editors. Let’s have a look at the command below:
cd /etc/profile.d/
sudo nano maven.sh
In the file, add the following code. Do check the Java path. Set the Java path carefully. If you haven’t installed java yet or need complete instructions, you can also follow the steps on tutorial how to install Java on Debian/Ubuntu? Add the following environment variables to the maven.sh file:
export JAVA_HOME=/usr/lib/jvm/jdk-14/
export M2_HOME=/usr/local/apache-maven
export MAVEN_HOME=/usr/local/apache-maven
export PATH=${M2_HOME}/bin:${PATH}
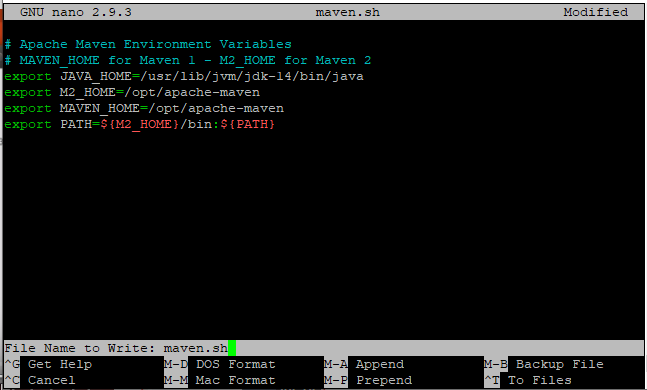
Don’t forget to save the changes. Use Ctrl + O to save the changes and Ctrl + X to exit the editor. I hope you got the point.
Grant permissions
The next step is to grant the permission to maven.sh file. We will simply change the permission of maven.sh file. For this, use chmod command to change the permissions of maven.sh file. Let’s have a look at the command below:
sudo chmod +x maven.sh
ls -al maven.sh

This command will change the permission i.e. to become an executable file. You can also check the permission granted to the file using ls command as shown above. Now that we have added the environment variables in the maven.sh file, we need the current session to use it. The source command will allow us to add these environment variables to our current environment.
source maven.sh
Verify Your Apache Maven Install
Till now, we have successfully set up the permissions and all the necessary prerequisites. Hence, we need to verify the installation of Apache Maven. We will use –version option to check the version of maven installed. Let’s have a look at the command below:
mvn --version

You can see the version details of the Java as well Apache Maven. That’s it, you now know how to install Apache Maven in Ubuntu.
Conclusion
We have now learned how to install Apache Maven in Ubuntu/Debian. I hope you understood the installation process. If face any issues, do let us know in the comment section.